Student First - How to register a student for classes
How To Register a Student in Student First
1. On the left-hand side menu go to Students > Student Enrollments
2. Search the student who you want to register for classes either by A# or by typing the student's name (ex. Doe, John if searching for John Doe).
Also ensure you are accessing the student's most recent enrollment, this is shown by the start term column with the most recent start term.
This can also be checked within the student's profile under the "Multiple Enrollments" drop-down menu by looking at the start dates.
*Every student will have an "Advisor Registration Hold" the student's advisor will need to release. To view holds go to Student > Holds in the left-hand side navigation menu.
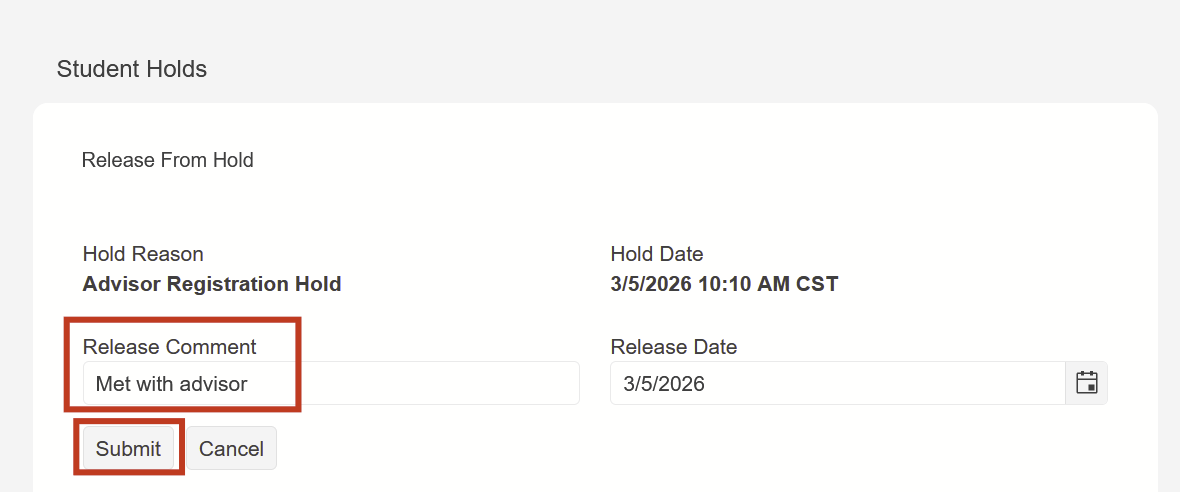
Here click on the "Advisor Registration Hold" and make sure it gets highlighted in blue, then click the "release" button.
It will then ask you to type a release comment before releasing the hold.
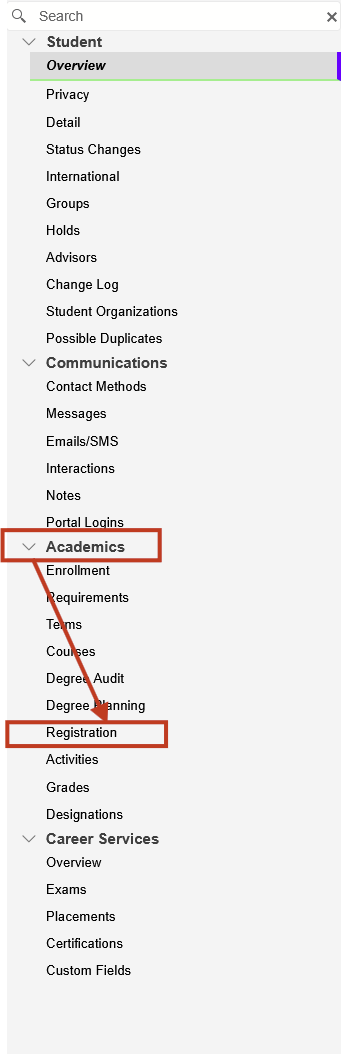
3. Once the hold is released, in the student's profile go under Academics > Registration
4. Once on this screen select the term you are wanting to register the student for.
5. It will then display only the courses that are part of the student's program of study. Search the course you want to register the student for and click on one of the times the class is offered, then click add to calendar.
To add a course that is not part of the student's program of study first click the "Add" button, then search the course by the course code, and click "Save". You will then need to search the added course again and follow the process in step 5.

As you add courses to a student's schedule they will appear on the calendar on the right. To remove a course from the calendar click the arrow on the top left corner of the course in the calendar, then click "Remove from Calendar" under where the course information is.
*Note
that online courses will only appear in the "List" view. Also, in the
List view the status "pending confirmation" means the student is not
confirmed, and the status "Scheduled" means the student is registered
and confirmed for that course.
6. Once you have added all the courses click the "Confirm Registration" button at the top right of the screen.
If instead of "Confirm Registration" the button reads "Registration Hold" please go back to step 2 and follow the instructions on how to release the Advisor Registration Hold.
7. To re-add the Advisor Registration Hold so that the student cannot un-enroll or change their registration once it is completed first go to the "Holds" tab as shown in step 2 and click "Add" at the top left.

Then in the drop-down box select the "Advisor Registration Hold" and add a comment as to why you are adding the hold.
Once those are set click "save" and the hold will show up in the student's holds page!


Related Articles
Student First - Registering for Classes
Student First - Registering for Classes Please note: You will be able to register for classes once the course registration tab has populated in your Student First Portal and the hold has been removed from your account. If you prefer a video tutorial ...Student First - Viewing Student Transcripts
How to View Student Transcripts Step 1: Navigate to the Faculty Portal of Student First by clicking Here Step 2: Navigate to Students in the red column on the left side of the screen and then click Student Enrollments Step 3: In the search bar ...Student First - How to View Classes
How to View Classes Step 1: Navigate to the Faculty Portal of Student First by clicking Here Step 2: In the red column, select Academics, and then Scheduling Step 3: Under Course Sections, select the term you would like to view the classes for. Step ...Student First Checking Grades
At the Student First home page on the left-hand side click the “Grades” option. It will bring you to this page where you can check the grades of all previous and current classes you are enrolled in.Student First Finding Student Emails
At the home page of Student First scroll down until you see the “Classes” block. Here all of the courses assigned to you will appear. Click on the course code of the course you want to view, and it will bring you to the following page, to view the ...